Validic is the industry-leading digital health platform and our Validic Connect API allows nearly anyone generating health and wellness data to seamlessly share it with organizations seeking to consume it. Typical Validic customers are healthcare organizations, wellness companies, and fitness-related organizations. We're looking for partners who are developing medical, wellness, fitness applications and devices that provide reliable, actionable data, but don't want to develop or maintain an API. Just push your data to us and we'll take care of the rest.
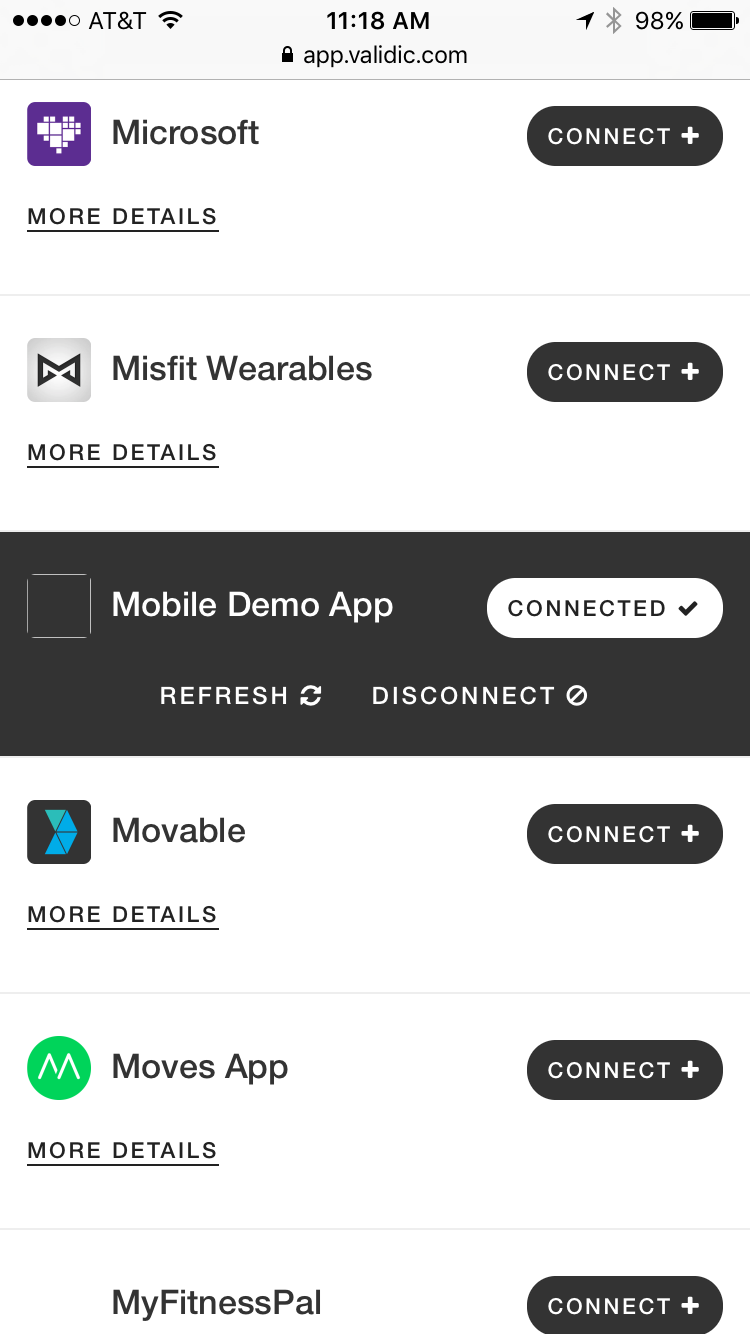
After integrating with Validic Connect, your application will be visible to millions of users in the Validic Marketplace. As a Validic Connect partner, we'll make it easy for you to find organizations who want your users' data and make it easy for them to consume it.
Roles
Terms
Integrating with Validic Connect involves two main workflows: first, supporting authorization requests to your app and, secondly, pushing user data to Validic Connect. As part of the authorization process we can accommodate traditional web apps as well as mobile-only applications without server-side login. Following the authorization process, your app will make CRUD requests to Validic Connect to push that user's records in the form of Validic's Standard Objects.
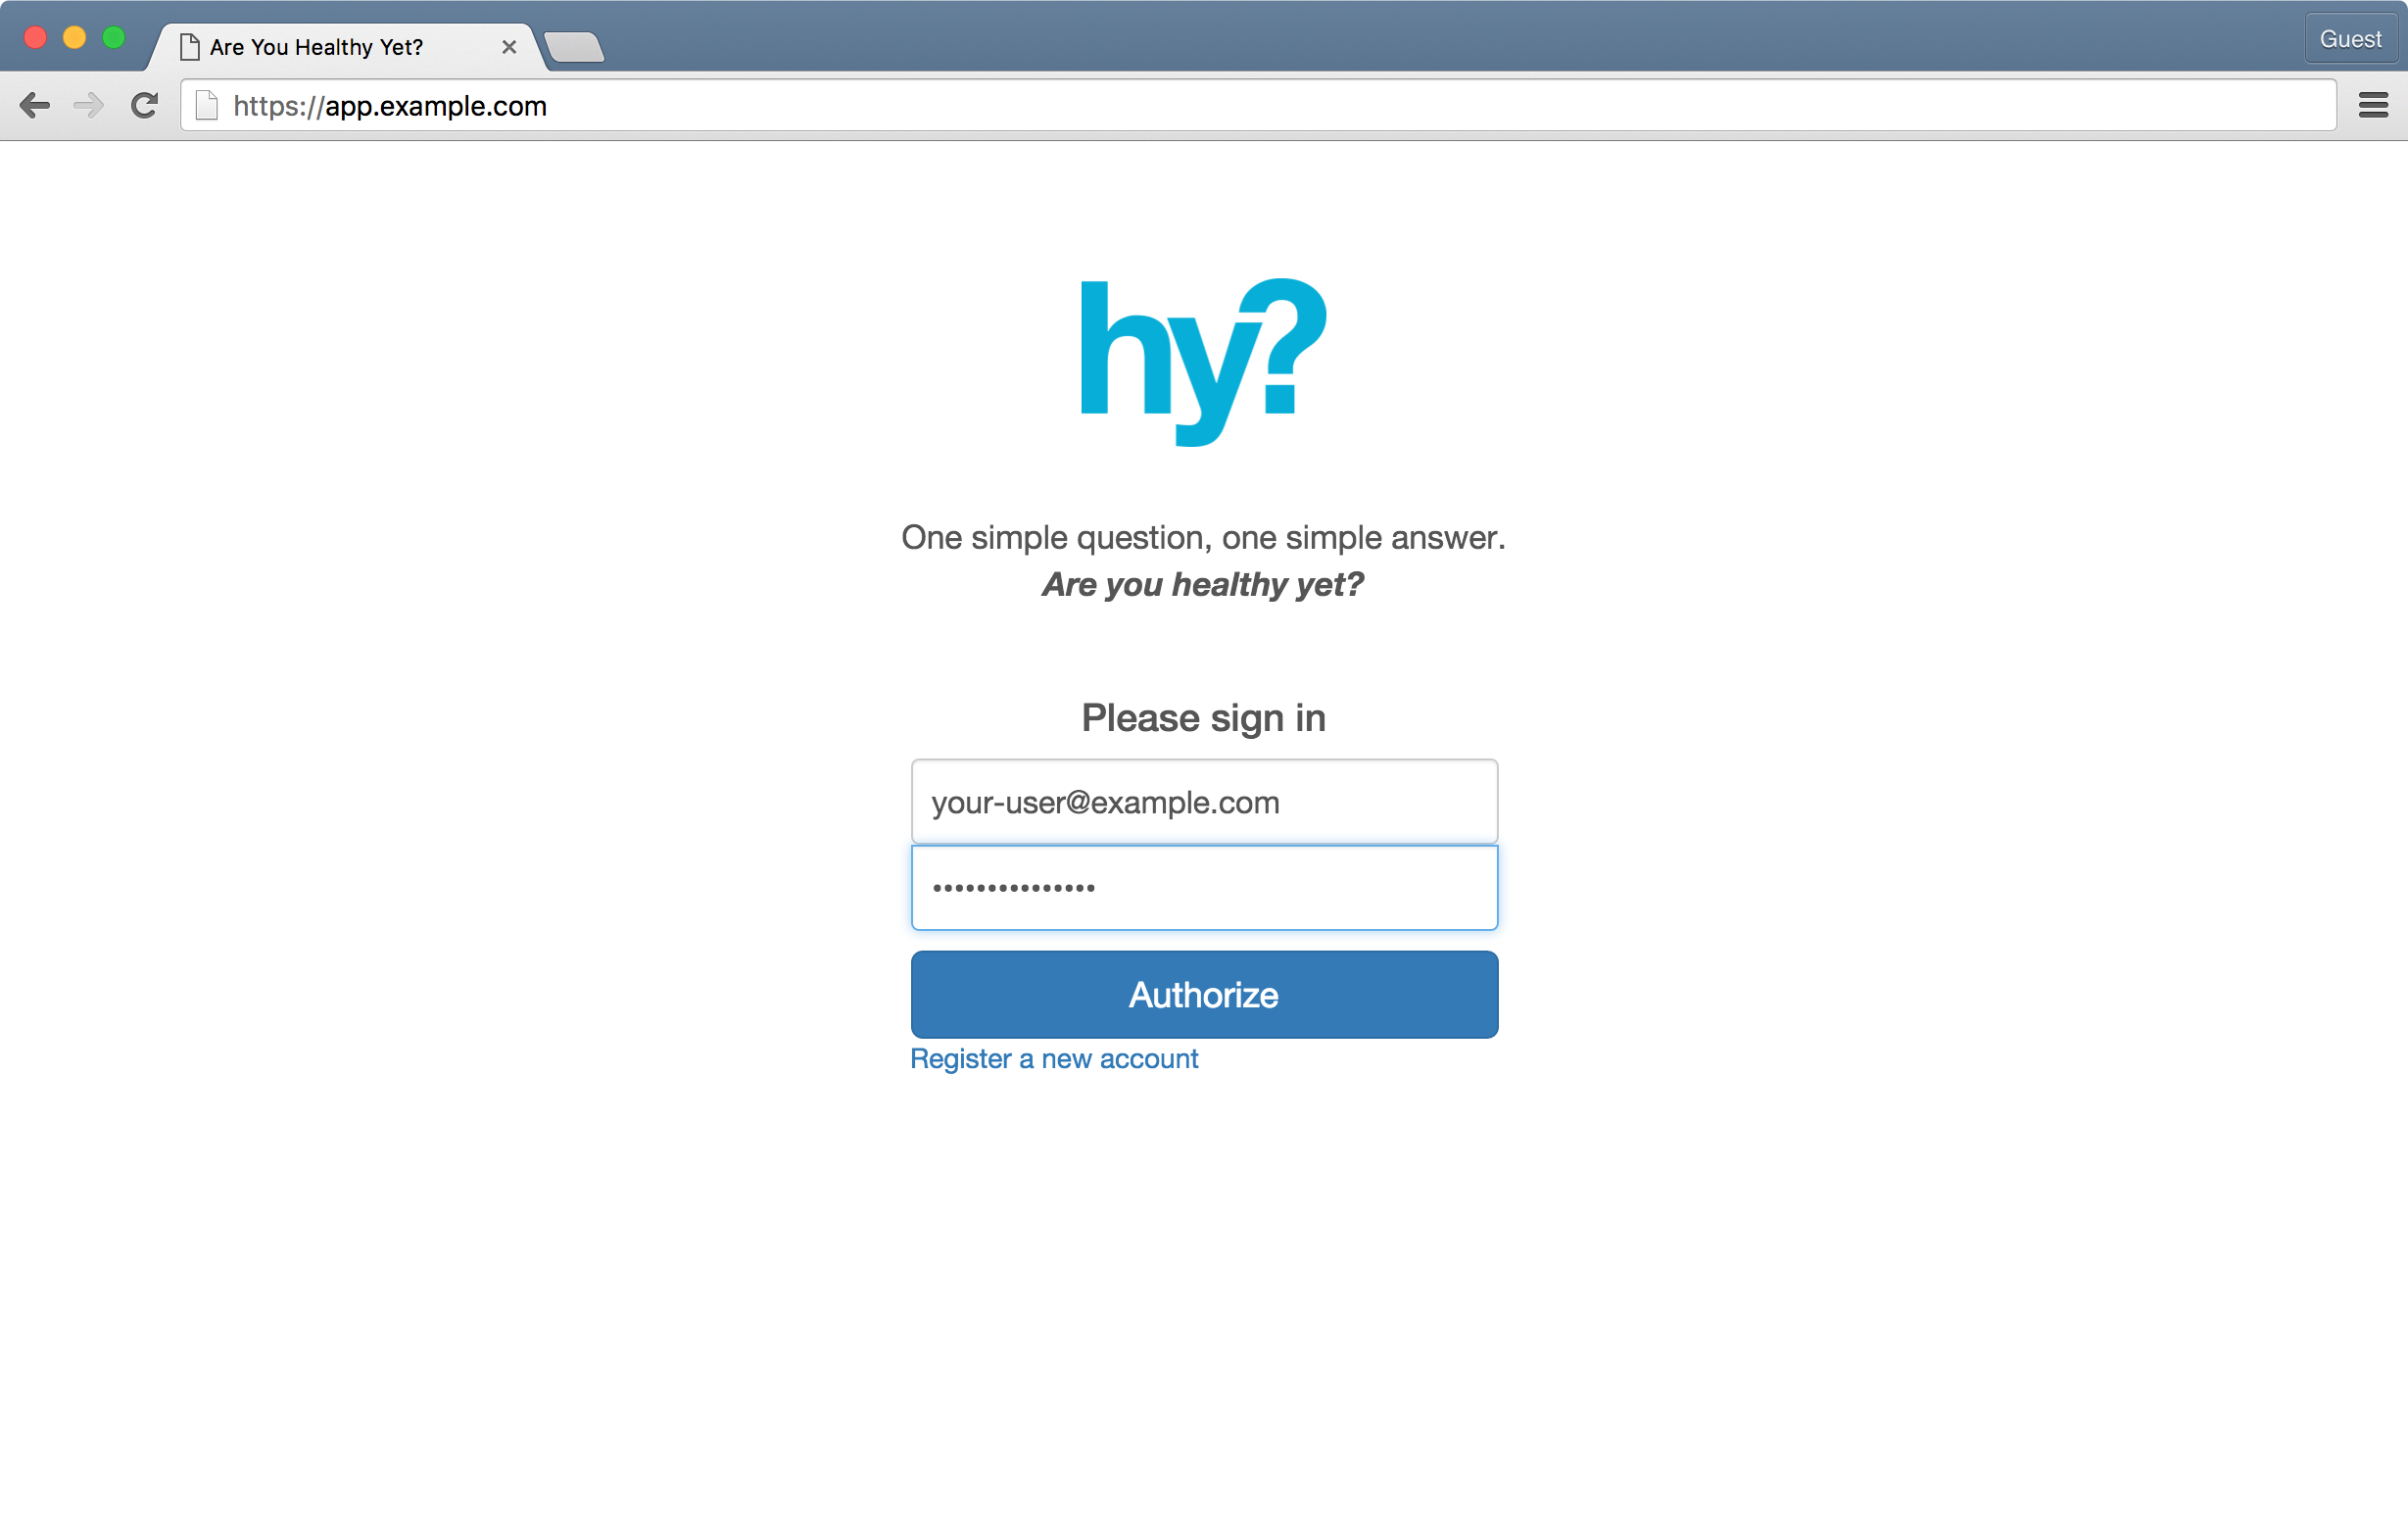
Similar to an OAuth process, you must first authenticate the user and ask them to authorize sharing their data with the consumer organization. Here's an example of a typical user experience:
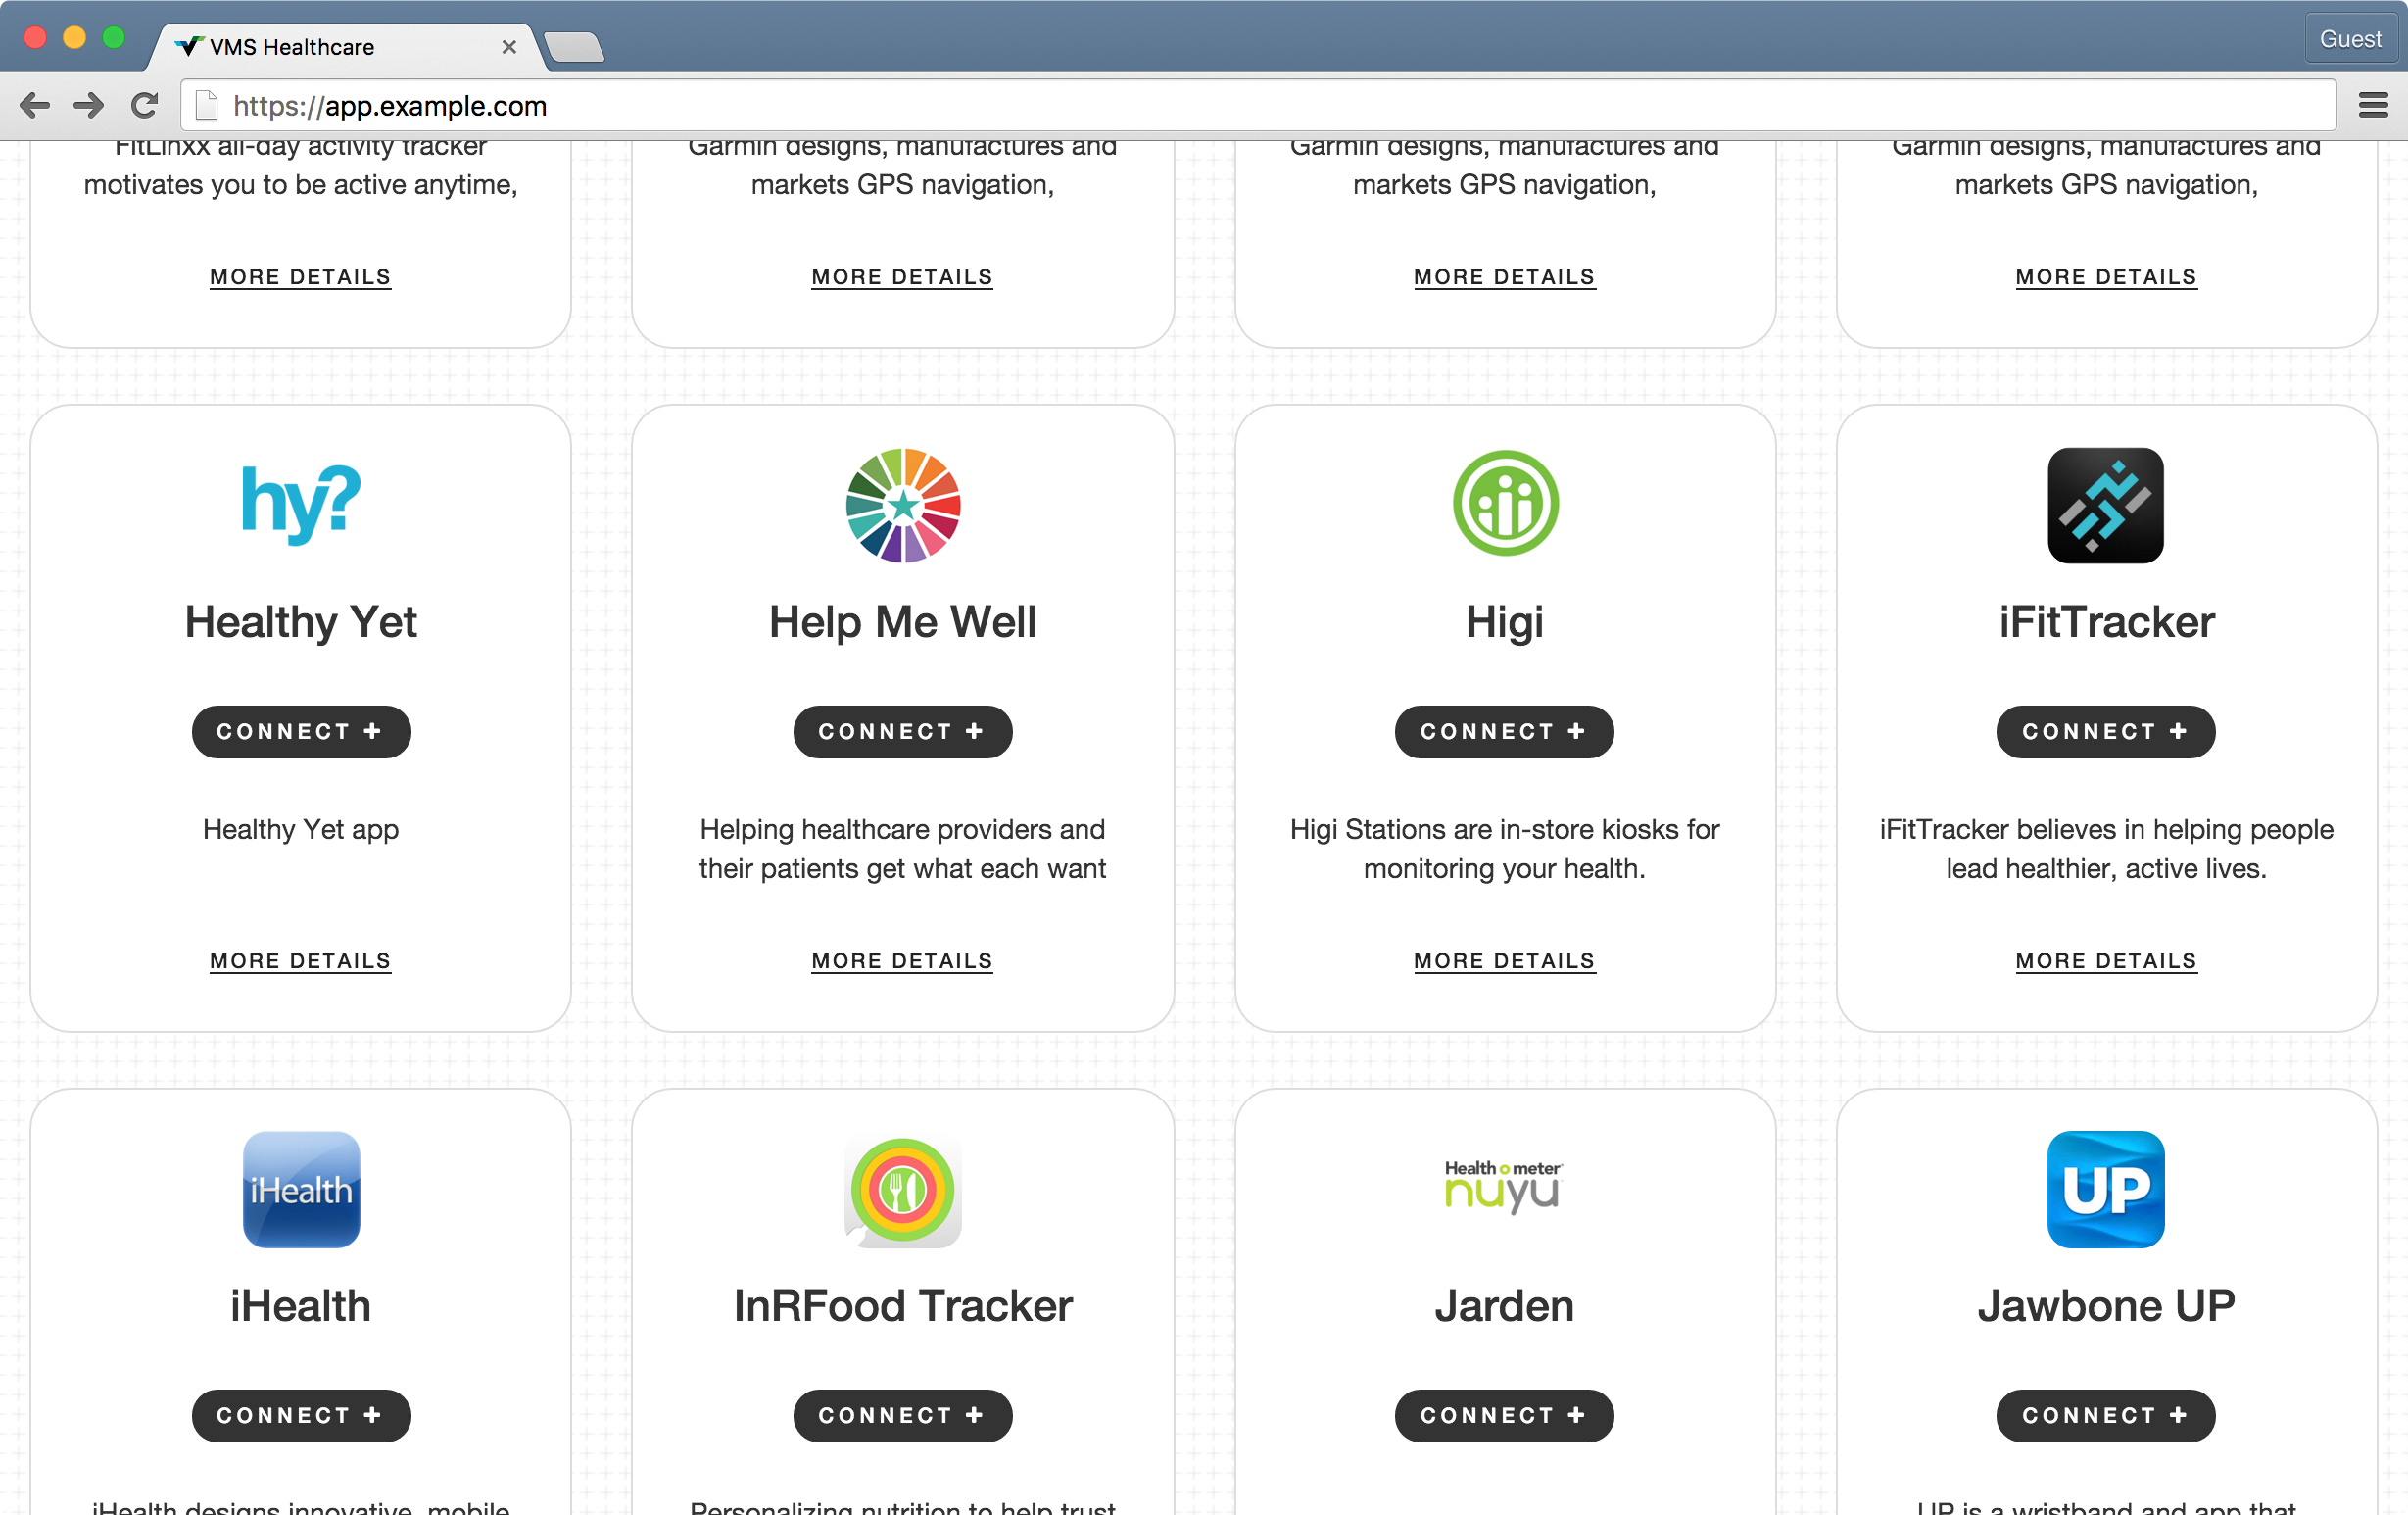
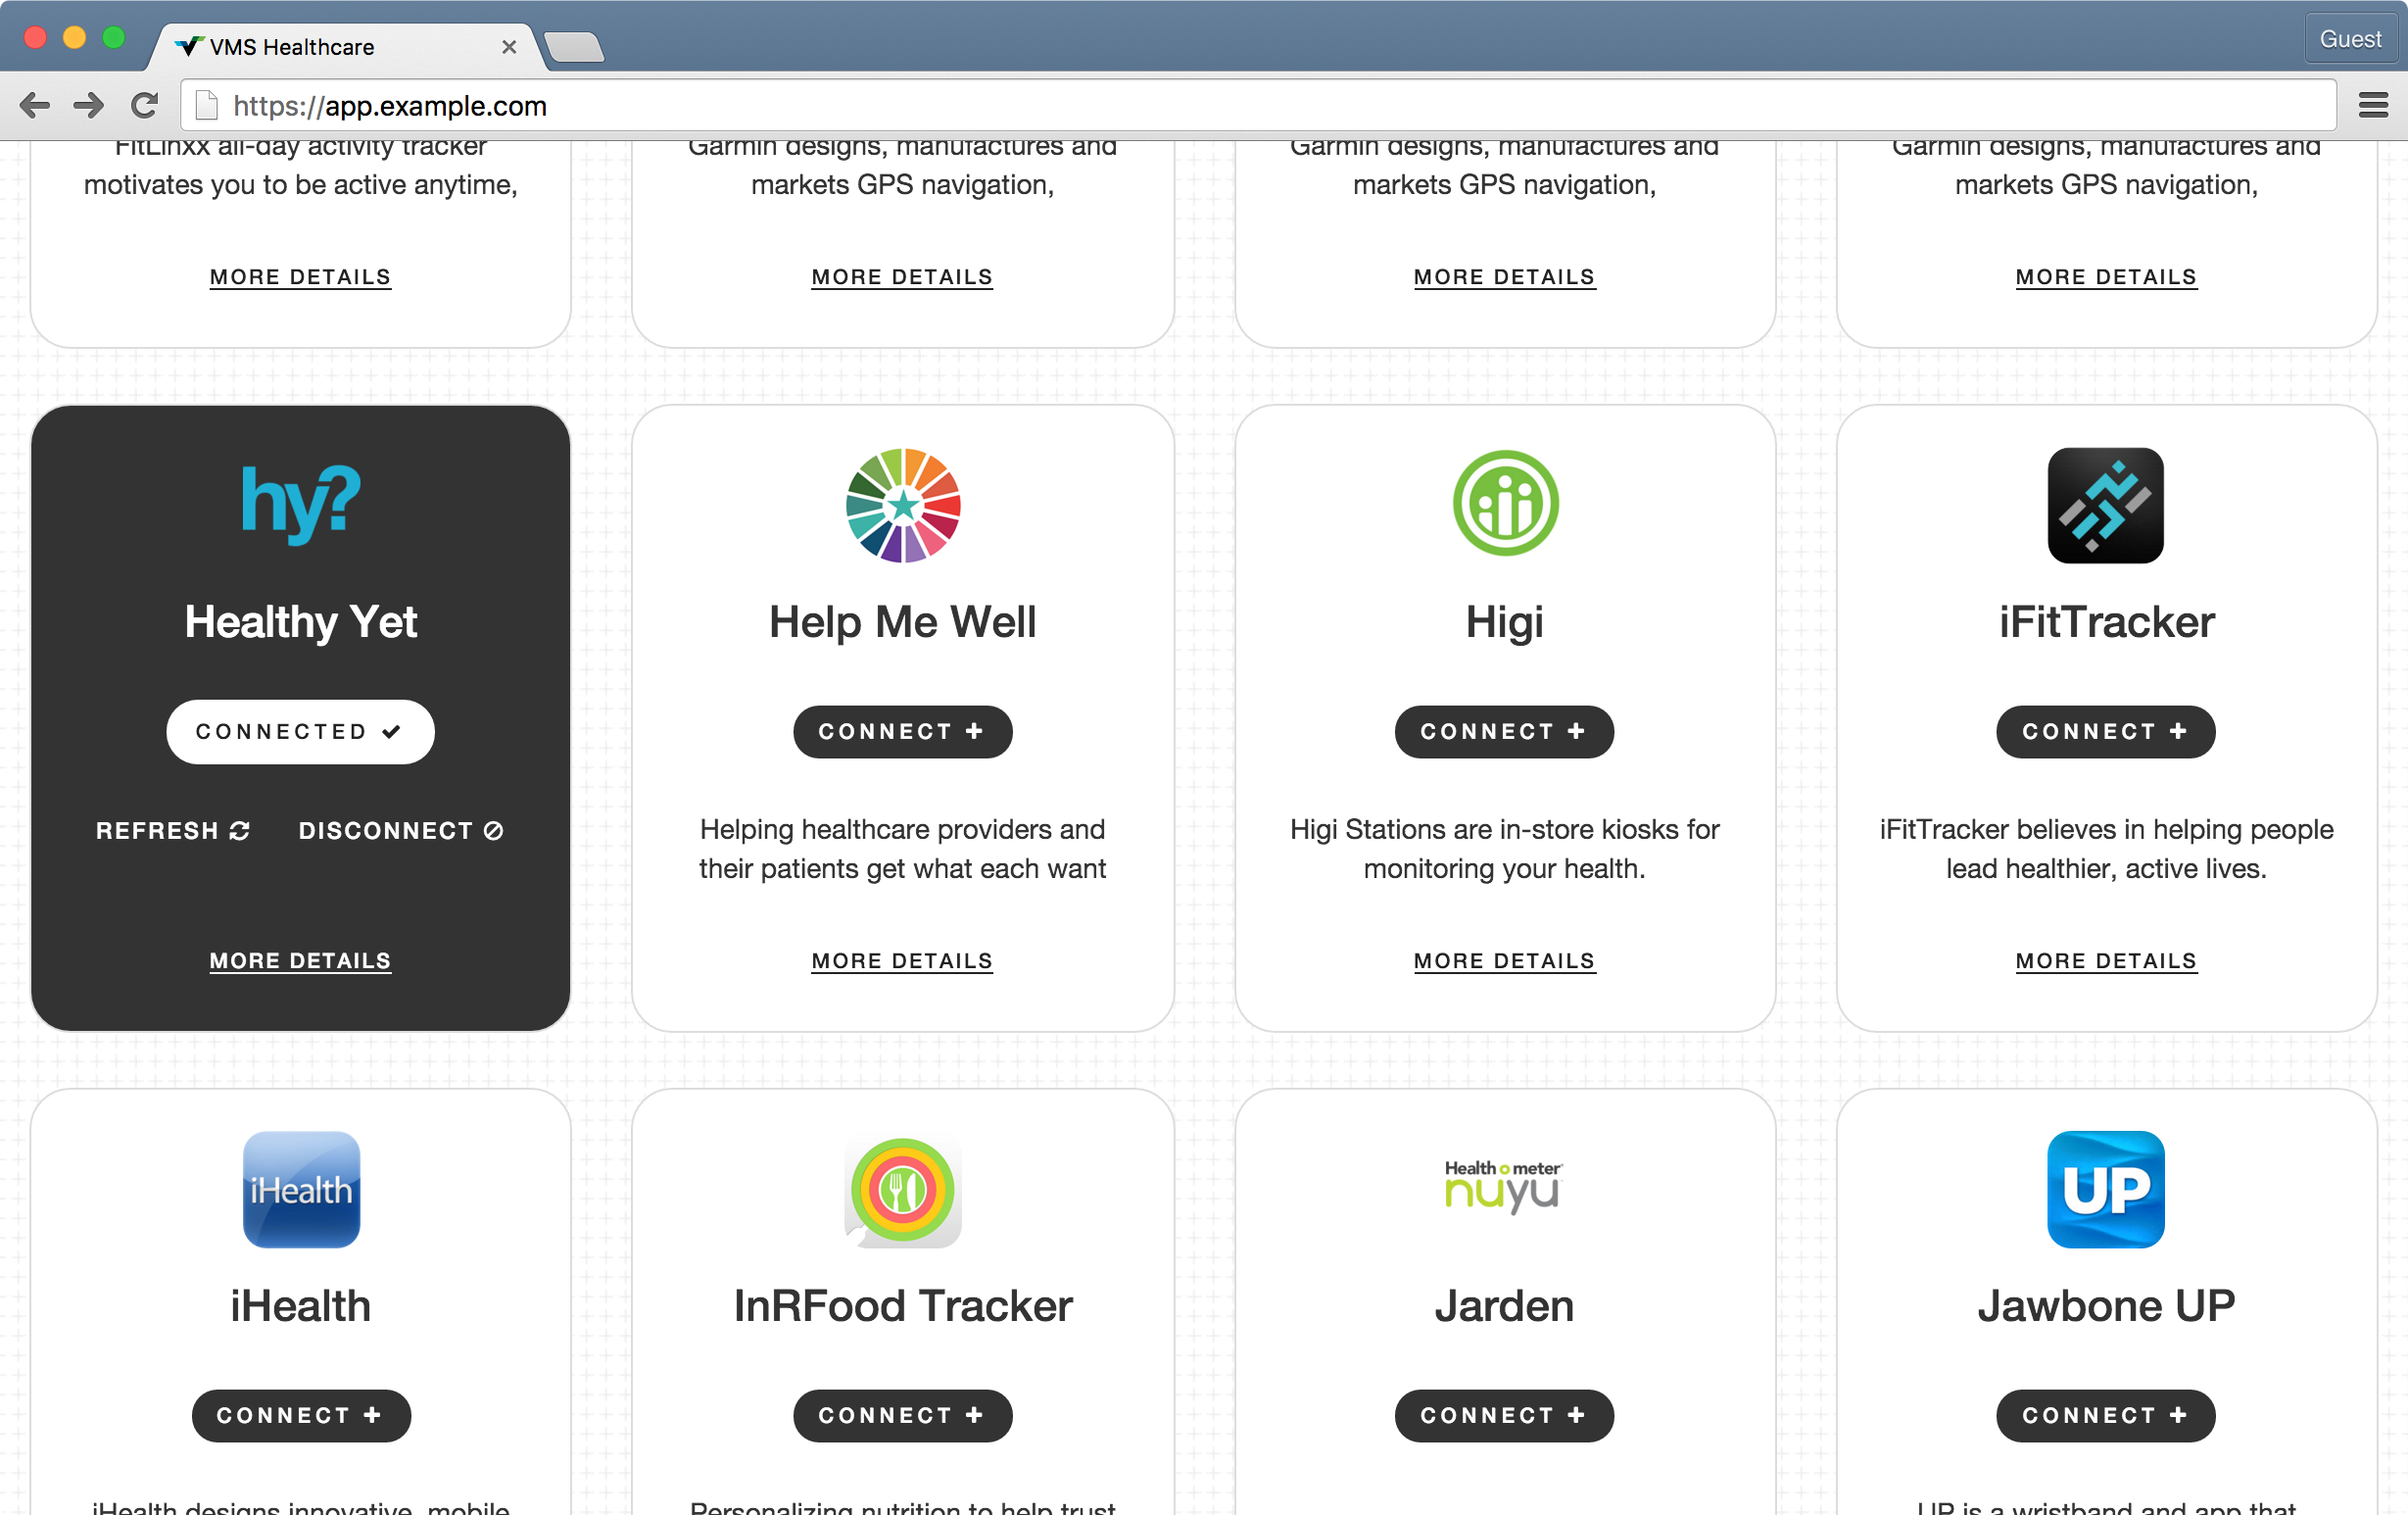
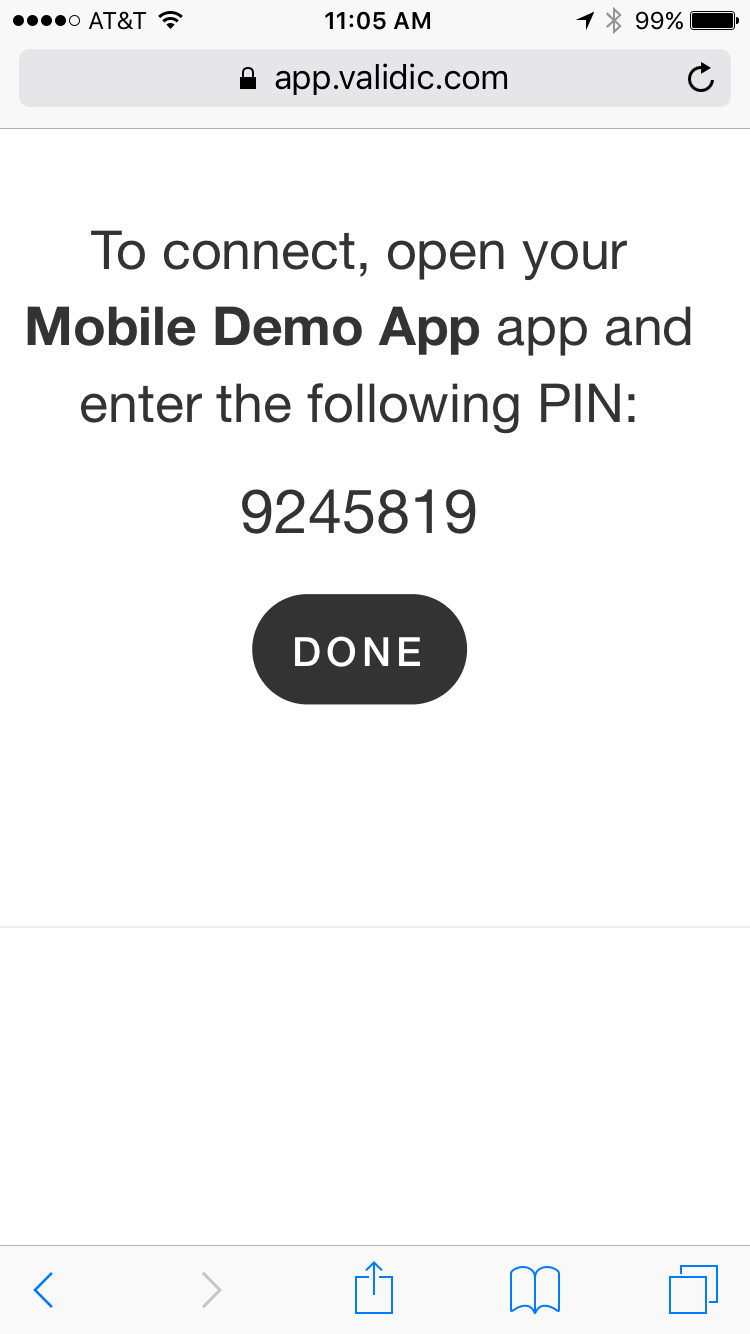
Mobile authorization is also a familiar process that uses PIN-based confirmation.
Following the authorization process, you will begin pushing that user's data through Validic. Once created in Validic, these records will be available to the consumer organization.
In order to get started with Validic Connect, you’ll need to Apply. Once accepted, you should create your first Application and receive the following credentials attached to that Application:
Using these credentials, you can begin integrating with the Validic Connect API.
When you've completed your application, tested the auth process and data transfer, and decide it's ready for release, you will submit your App for review. We'll need to gather some additional information about your application, go through an internal testing process, and work with you to find some beta customers to test your integration with real-world data. Once approved, your app will be available to our customers as an official part of the Validic Marketplace.
There are several required aspects of for any application to integrate with Validic Connect. This section outlines the specific steps you need to take be able to provision users, which in turn will enable you to begin pushing data. As you start to work on your application you may find it helpful to review the Validic Enterprise API docs to get a better idea of how organizations will be consuming the data you push to Validic Connect.
Validic Connects supports integration of both web and mobile apps. The authorization process for each type of app is slightly different, but both will be familiar to users. The outcome of both processes is a Validic user being provisioned to receive incoming data. You only need to worry about setting up one or the other unless you're developing both a web based application and mobile application.
Determining Which Authorization Method to Use
Many of our Connect Partners feature both mobile apps and web apps as part of their product. When determining the authorization method you should use for your application, keep in mind that the mobile app authorization process is specifically for mobile apps that do not have a server-side component. If your mobile app sends data to a central server that in turn sends data to us, you should use the web-based application authorization process. If you will be sending requests to Validic Connect directly from your mobile app, you'll need to use the mobile PIN-based authorization process.
Determining a UID for Your Users
Determining a proper UID is crucial for authorization as well as ensuring proper transfer of data to Validic Connect. Your user’s UID should be a random string of letters and/or numbers, unique to each user in your system, and cannot be any kind of Personally Identifiable Information (PII) such as an email address, name, or social security number. Attempting to use PII as a UID may delay your integration with Validic Connect.
If you do not already have an acceptable unique identifier for each of your users, you must generate one for them. This can be done on the fly or in bulk depending on your preferences; however, it must be done before confirming authorization. If you choose to generate a UID on the fly, you must persist that UID as part of that user’s record in your system and validate uniqueness upon generation.
You should always send the same UID for a particular user to confirm authorization. For example, if a user reconnects after a disconnect or authorizes several consumer organizations you should send the same UID with each authorization confirmation.
The authorization process verifies that a user intending to share their data from your application is in fact the owner of that data. Similar to a standard OAuth implementation, you’ll need to create an authorization page where users can verify their identity and subsequently authorize their data to be shared. This page will be different than your standard login page and should be accessible via your Authorization URL. Once the user is successfully authenticated and has authorized you to share their data, you’ll need to send us a UID to associate your user with a user in Validic Connect.
Creating Your Authorization Page
How to design your authorization page is largely up to you; however, there are a few requirements and best practices to ensure successful integration with Validic Connect. As mentioned above, your authorization page will need to be separate from your standard login area to facilitate the Validic authorization process. We also ask that you add a the following HTML class attributes to the "username", "password", and "submit button" elements of your page:
<form>
  <label for="inputEmail">Email address</label>
  <input type="email" id="inputEmail" class="vc-username">
  <label for="inputPassword">Password</label>
  <input type="password" id="inputPassword" class="vc-password">
  <button class="vc-submit-button" type="submit">Allow Access</button>
</form>
Using these names will help facilitate our automated marketplace testing process, which will allow us to alert you to any changes in the availability of your application in the Marketplace. Feel free to download our authorization page template to help you get started with front-end design. If your authorization page will not be using fields similar to these, please let us know so we can properly test your application in the Marketplace
Receiving Authorization Requests
Users will access your authorization page via a link in the Marketplace to the Authorization URL you submitted. Here's an example Authorization URL:
https://yourdomain.com/your_authorization_url
The request from Validic Connect to your Authorization URL is a 302 redirect that will include three parameters:
signature -- A unique identifier for the auth session.consumer_name -- URL encoded name of the consumer organization.consumer_logo -- URL encoded URI that points to the consumer organization's logo to display on your authorization pageredirect_uri -- URL encoded URI where you will redirect the user after authorizationHere's an example of a redirect to your Authorization URL:
https://yourdomain.com/your_authorization_url?signature={SIGNATURE}&consumer_name={CONSUMER_ORG_NAME}&redirect_uri={VALIDIC_SYNC_PATH}
You will need to temporarily retain the signature, consumer_name, and redirect_uri.
Confirming Authorization Requests
Once a user has successfully authenticated and accepted authorization, you’ll send a POST to Validic confirming the authorization. That POST will look like this:
POST https://api.validic.com/v1/organizations/{ORGANIZATION_ID}/connect/authorization
-H 'Content-Type: application/json'
{
  "uid": "{YOUR_USERS_UID}",
  "signature": "{SIGNATURE}",
  "access_token": "{ORGANIZATION_ACCESS_TOKEN}"
}
uid -- The users UID in your system.signature -- The signature parameter from the request to your Authentication URL.access_token -- Your access token to verify the requestIf the authorization confirmation is a successful new user authorization, you will receive a 201 response. Upon receiving the response you should flag this user as connected to Validic and store the Validic _id and authentication_token for pushing user data. If we have previously received an authorization confirmation for a user with the same UID, you will receive a 200 response rather than a 201. The response looks like this:
{
  "code": 201,
  "message": "Authorized",
  "user": {
    "_id": "VALIDIC_USER_ID",
    "uid": "YOUR_USERS_UID",
    "authentication_token": "VALIDIC_USER_ACCESS_TOKEN"
},
  "consumer_name": "CONSUMER_NAME",
}
_id -- Validic's unique identifier for the user. You must associate this with your user to push data to Validic Connect.uid -- The UID you provided to us. This confirms we have authorized the correct user.authentication_token -- The user's Validic authentication token. Retain this as part of your user's records, too.consumer_name -- The name of the consumer organization the user authorized. Store this if you want to display a list of applications the user is sharing data with.redirect_uri -- you redirect the user here for the authorization step of the process.Redirecting The User
Once you've saved the _id and authentication_token you will redirect the user to the redirect_uri. If you receive a response containing an error you should still redirect the user to the redirect_uri and check our API Responses guide for more information about that error.
To get started with mobile auth, you need to create a "PIN Input" page where the user will enter the PIN provided by us. This should be a page within your mobile app only available to logged in users. When the user enters a PIN, you will only need to make a single POST to Validic to confirm the authorization and receive Validic credentials on behalf of that user:
POST https://api.validic.com/v1/organizations/{ORGANIZATION_ID}/authorization/new_user
-H 'Content-Type: application/json'
 {
   "user": {
     "uid": "{YOUR_USER_ID}"
   },
 "pin": "{PINCODE}",
 "access_token": "{ORGANIZATION_ACCESS_TOKEN}"
 }
you receive a successful 201 response like this:
 {
   "code": 201,
   "message": "Authorized",
   "user": {
     "_id": "{USER_ID}",
     "uid": "{YOUR_USER_UID}",
     "access_token": "{USER_ACCESS_TOKEN}"
   },
   "application": "{THIRD_PARTY_APPLICATION_NAME}"
 }
_id -- Validic's unique identifier for the user. You must associate this with your user to push data to Validic Connect.uid -- The UID you provided to us. This confirms we have authorized the correct user.access_token -- The user's Validic access token. Retain this as part of your user's records, too.application -- The name of the consumer organization the user authorized. Store this if you want to display a list of applications the user is sharing data with -- just make sure the rest of the authorization process is successful before doing so.Once the user has successfully authorized sharing of their data, it is a best practice to send historical data for that user and begin submitting user data as it is created or updated.
Handling An Invalid Pincode Response
When an Authorization request fails, you receive a 401 Unauthorized response. In this case, you must handle the response properly for the user to know that the provided pincode was invalid or expired. Typically, this is done by providing an error notice in your app's "PIN Input" page. Pincodes are active for 30 minutes once generated by the user. In case of an expired pincode, you must inform your user to return to the Marketplace to generate a new pincode. Below is what an authorization request and 401 response will look like:
POST https://api.validic.com/v1/organizations/{ORGANIZATION_ID}/authorization
-H 'Content-Type: application/json'
{
  "access_token": "{USER_ACCESS_TOKEN}",
  "pin": "{PINCODE}"
}
The response:
{
  "code": 401,
  "message": "expired pin or bad request token"
}
Developers of both web and mobile apps will need to set up a Notification URL to receive user disconnect notifications from Validic to properly manage user connection status. You can add your "Notification URL" in the My App section of the Partner Hub. Your Notification URL should be similar to this:
https://yourdomain.com/validic_notifications
When a user decides to stop sharing their data with a consumer organization they will disconnect from your application in their Marketplace. When this happens you receive a disconnect notification that looks like this:
{
  "data": {
    "type": "disconnect",
    "message": "Confirmed disconnect",
    "third_party": "NAME_OF_THIRD_PARTY",
    "connected_third_parties": ["ARRAY_OF_CONNECTED_THIRD_PARTIES"],
    "user": {
      "_id": "VALIDIC_USER_ID",
      "uid": "YOUR_USER_ID"
    }
  }
}
type -- Lets you know the notification is an disconnect.message -- Provides some context for the notification.third_party -- The name of the consumer organization the user stopped sharing data with.connected_third_parties is an array of all consumer organizations with current authorization. If the user shares data with more than one consumer organization you will see the remaining organizations in the array. Otherwise, you will see an empty array._id -- Validic's unique identifier for the user.uid -- The UID you provided to us.If the connected_third_parties array is empty, you must stop sending data to Validic for that user.
Once you've set up your auth process and provisioned some test users, you are ready to push some data. Pushing data to Connect is as easy as sending a POST with the user's data. Validic supports 8 standard objects or data types. It's normal that some of your data may not fall cleanly into the Validic standard object schema. If that is the case, you should make your best guess for how the mappings should work and send that mapping to Validic for review.
Here's an example URL and standard payload to create a new Routine object:
POST https://api.validic.com/v1/organizations/{ORGANIZATION_ID}/users/{USER_ID}/routine.json
-H 'Content-Type': 'application/json'
{
  "routine": {
    "timestamp": "2015-03-10T00:00:00+00:00",
    "utc_offset": "+00:00",
    "steps": 9355,
    "distance": 7290.33,
    "floors": 23,
    "elevation": 3.4,
    "calories_burned": 2874,
    "activity_id": "12345"
  },
  "access_token": "YOUR_ACCESS_TOKEN"
}
ORGANIZATION_ID -- your Validic Connect Organization IDUSER_ID -- your user’s Validic Connect IDYOUR_ACCESS_TOKEN -- the access token that goes with your Connect Organization IDIf the record is successfully created you receive this 201 response:
{
  "code": 201,
  "message": "Ok",
  "routine": {
    "_id": "51552cdbfded0807c400006d",
    "timestamp": "2015-03-10T00:00:00+00:00",
    "utc_offset": "+00:00",
    "steps": 9355,
    "distance": 7290.33,
    "floors": 23.0,
    "elevation": 3.4,
    "calories_burned": 2874,
    "source": "sample_app",
    "source_name": "Sample App",
    "last_updated": "2015-03-10T07:12:16+00:00"
  }
}
_id -- the identifier for this record in Validic. Retain this as part of the record in your databasesource & source_name -- the source of the data. These are set by us when setting up your application.The Validic _id in the response for this activity should then be saved as part of the record in your database to allow you to update or delete this record in the future.
Partners have the option to push up to 100 records in a single POST by including your objects in an array:
POST https://api.validic.com/v1/organizations/{ORGANIZATION_ID}/users/{USER_ID}/fitness.json
-H 'Content-Type': 'application/json'
{
  "fitness": [
    {
      "timestamp": "2013-03-10T07:12:16+00:00",
      "utc_offset": "-05:00",
      "type": "Running",
      "intensity": "medium",
      "start_time": "2013-03-09T02:12:16-05:00",
      "distance": 5149.9,
      "duration": 1959,
      "calories": 350,
      "activity_id": "12345",
    },
    {
      "timestamp": "2013-03-10T08:12:16+00:00",
      "utc_offset": "-05:00",
      "type": "Running",
      "intensity": "medium",
      "start_time": "2013-03-09T03:12:16-05:00",
      "distance": 6149.9,
      "duration": 2959,
      "calories": 450,
      "activity_id": "6789",
    }
  ],
  "access_token": "YOUR_ACCESS_TOKEN"
}
A successful POST will return:
{
  "fitness": [
    {
      "_id": "51552cdbfded0807c400006d",
      "timestamp": "2013-03-10T07:12:16+00:00",
      "utc_offset": "-05:00",
      "type": "Running",
      "intensity": "medium",
      "start_time": "2013-03-09T02:12:16-05:00",
      "distance": 5149.9,
      "duration": 1959,
      "calories": 350,
      "source": "sample_app",
      "source_name": "Sample App",
      "activity_id": "12345",
      "last_updated": "2015-03-11T07:12:16+00:00"
    },
    {
      "_id": "51452bxbf3edc801c4d0008b",
      "timestamp": "2013-03-10T08:12:16+00:00",
      "utc_offset": "-05:00",
      "type": "Running",
      "intensity": "medium",
      "start_time": "2013-03-09T03:12:16-05:00",
      "distance": 6149.9,
      "duration": 2959,
      "calories": 450,
      "source": "sample_app",
      "source_name": "Sample App",
      "activity_id": "6789",
      "last_updated": "2015-03-11T07:12:16+00:00"
    }
  ],
  "errors": []
}
If any of the objects in the array were successfully created you will receive a 201 response. If no objects were successfully created you will receive a 422. In the case where some records were successfully created and others were not, you will receive a 201 but with the bad records included in the errors array. Each of the bad records can be identified by the activity_id you provided:
POST https://api.validic.com/v1/organizations/{ORGANIZATION_ID}/users/{USER_ID}/fitness.json
-H 'Content-Type': 'application/json'

{
  "fitness": [
    {
      "timestamp": "2013-03-10T07:12:16+00:00",
      "utc_offset": "-05:00",
      "type": "Running",
      "intensity": "medium",
      "start_time": "2013-03-09T02:12:16-05:00",
      "distance": 5149.9,
      "duration": 1959,
      "calories": 350,
      "activity_id": "12345",
    },
    {
      "timestamp": "invalid timestamp",
      "utc_offset": "-05:00",
      "type": "Running",
      "intensity": "medium",
      "start_time": "2013-03-09T03:12:16-05:00",
      "distance": 6149.9,
      "duration": 2959,
      "calories": 450,
      "activity_id": "6789",
    }
  ],
  "access_token": "YOUR_ACCESS_TOKEN"
}
A partially successful response will have a 201 status and look like this:
{
  "fitness": [
    {
      "_id": "51552cdbfded0807c400006d",
      "timestamp": "2013-03-10T07:12:16+00:00",
      "utc_offset": "-05:00",
      "type": "Running",
      "intensity": "medium",
      "start_time": "2013-03-09T02:12:16-05:00",
      "distance": 5149.9,
      "duration": 1959,
      "calories": 350,
      "source": "sample_app",
      "source_name": "Sample App",
      "activity_id": "12345",
      "last_updated": "2015-03-11T07:12:16+00:00"
    }
  ],
  "errors": [
    {
      "code": 422,
      "message": "Unprocessable Entity",
      "errors": "Timestamp does not meet format specification or not in UTC time",
      "activity_id": "6789",
    }
  ]
}
If you receive a response where some records were not created successfully, you should correct the errors and send another POST with those records.
Records can be viewed using a GET to Validic. Individual records can be viewed using that record's Validic _id:
GET https://api.validic.com/v1/organizations/{YOUR_ORGANIZATION_ID}/users/{VALIDIC_USER_ID}/fitness/{VALIDIC_RECORD_ID}.json?access_token={YOUR_ORGANIZATION_ACCESS_TOKEN}

{
  "summary": {
      "status": 200,
      "message": "Ok",
      "results": 1,
      "start_date": "2016-01-21T00:00:00+00:00",
      "end_date": "2016-01-23T23:59:59+00:00",
      "offset": 0,
      "limit": 100,
      "previous": null,
      "next": null,
      "params": {
          "start_date": null,
          "end_date": null,
          "offset": 0,
          "limit": 0
      }
  },
  "fitness": [
    {
      "_id": "51552cdbfded0807c400006d",
      "timestamp": "2016-01-21T05:00:00+00:00",
      "utc_offset": "-05:00",
      "type": "Running",
      "intensity": "medium",
      "distance": 5149.9,
      "duration": 1959,
      "calories": 350,
      "source": "sample_app",
      "source_name": "Sample App",
      "activity_id": "12345",
      "last_updated": "2015-03-11T07:12:16+00:00"
    }
  ]
}
Records can also be viewed in aggregate:
GET https://api.validic.com/v1/organizations/{YOUR_ORGANIZATION_ID}/users/{VALIDIC_USER_ID}/fitness.json?access_token={YOUR_ORGANIZATION_ACCESS_TOKEN}

{
  "summary": {
      "status": 200,
      "message": "Ok",
      "results": 2,
      "start_date": "2016-01-21T00:00:00+00:00",
      "end_date": "2016-01-23T23:59:59+00:00",
      "offset": 0,
      "limit": 100,
      "previous": null,
      "next": null,
      "params": {
          "start_date": null,
          "end_date": null,
          "offset": 0,
          "limit": 0
      }
  },
  "fitness": [
    {
      "timestamp": "2016-01-21T05:00:00+00:00",
      "utc_offset": "-05:00",
      "type": "Running",
      "intensity": "medium",
      "distance": 5149.9,
      "duration": 1959,
      "calories": 350,
      "activity_id": "12345",
    },
    {
      "timestamp": "2016-01-21T06:00:00+00:00",
      "utc_offset": "-05:00",
      "type": "Running",
      "intensity": "medium",
      "distance": 6149.9,
      "duration": 2959,
      "calories": 450,
      "activity_id": "6789",
    }
  ],
}
If you need to modify a record in Validic, send a PUT using the existing record’s Validic _id as returned from a successful POST:
PUT https://api.validic.com/v1/organizations/{ORGANIZATION_ID}/users/{USER_ID}/routine/{VALIDIC_RECORD_ID}.json
-H 'Content-Type': 'application/json'

{
  "routine": {
    "steps": 10355
  },
  "access_token": "YOUR_ACCESS_TOKEN"
}
A successful PUT will return with:
{
    "code": 200,
    "message": "Ok",
    "routine": {
      "_id": "51552cdbfded0807c400006d",
      "timestamp": "2015-03-10T07:12:16+00:00",
      "utc_offset": "+00:00",
      "steps": 10355,
      "distance": 7290.33,
      "floors": 23.0,
      "elevation": 3.4,
      "calories_burned": 2874,
      "source": "sample_app",
      "source_name": "Sample App",
      "last_updated": "2015-03-10T07:12:16+00:00"
    }
}
This is particularly relevant for Routine data which represents data aggregated over the course of the day (for example “steps”) instead of single data point on that day. If you are pushing Routine data such as steps, you should POST a single record representing that day’s running total and subsequently send PUT requests to update that single record.
If you need to delete a record in Validic send a DELETE request using the existing record’s Validic _id. We'll identify the record by the VALIDIC_RECORD_ID, so all you need to include in the body is your access token.
DELETE https://api.validic.com/v1/organizations/{ORGANIZATION_ID}/users/{USER_ID}/routine/{VALIDIC_RECORD_ID}.json
-H 'Content-Type': 'application/json'

{
  "access_token": "YOUR_ACCESS_TOKEN"
}
you receive a standard 200 OK response if the record was successfully deleted.
{
  "code: 200,
  "message: "Ok"
}
Understanding the way Validic handles timestamps and timezones is critical before you begin pushing user data. The record's timestamp represents when an activity was recorded and must be in ISO 8601 format in UTC time. Separate from the timestamp, the offset is stored in its own utc_offset field.
# Ruby Example
require 'date'

your_timestamp = DateTime.parse('3rd Feb 2001 04:05:06+03:00')
=> #<DateTime: 2001-02-03T04:05:06+03:00 ((2451944j,3906s,0n),+10800s,2299161j)>
utc_offset = your_timestamp.zone
=> "+03:00"
timestamp = your_timestamp.new_offset(0).iso8601
=> "2001-02-03T01:05:06+00:00"
In order to ease compliance with this standard, the Connect API will also accept POSTed records that only supply a valid ISO 8601 timestamp. In the case where the timestamp is supplied and the utc_offset is not, the timestamp's offset will be used to populate the utc_offset and the timestamp will then be converted to UTC. Note: this does not apply to updated records through PUTs.
For example, consider the following POST body and response:
{
  "fitness":
    {
      "timestamp": "2013-03-10T07:12:16+05:00",
      "type": "Running",
      "intensity": "medium",
      "start_time": "2013-03-09T02:12:16+05:00",
      "distance": 5149.9,
      "duration": 1959,
      "calories": 350,
      "activity_id": "12345",
    }
  "access_token": "YOUR_ACCESS_TOKEN"
}
Response:
{
  "code": 201,
  "message": "Ok",
  "fitness": {
    "_id": "51552cdbfded0807c400006d",
    "timestamp": "2013-03-10T07:12:16+00:00",
    "utc_offset": "+05:00",
    "type": "Running",
    "intensity": "medium",
    "start_time": "2013-03-09T02:12:16+05:00",
    "distance": 5149.9,
    "duration": 1959,
    "calories": 350,
    "source": "sample_app",
    "source_name": "Sample App",
    "activity_id": "12345",
    "last_updated": "2015-03-11T07:12:16+00:00"
  }
}
Routine objects are a special case because they aggregate data throughout the day. The timestamp and timezone for a routine object should be the timestamp at midnight UTC and the offset for that user's current timezone. Here are a couple examples:
# User with an offset of +00:00 on 2015-03-10 in their time zone
...
"timestamp": "2015-03-10T00:00:00+00:00",
"offset": "+00:00"
...

# User with an offset of -04:00 on 2015-03-10 in their time zone
...
"timestamp": "2015-03-10T04:00:00+00:00",
"offset": "-04:00"
...

# User with an offset of +08:30 on 2015-03-10 in their time zone
...
"timestamp": "2015-03-09T15:30:00+00:00",
"offset": "+08:30"
...
As you can see, the offset is applied to the timestamp by adding or subtracting the offset from the midnight local time timestamp.
The activity_id you send with each record must be a unique identifier for this record in your system, analogous to the uid you submitted earlier.
Routine records are a special case because they represent data that is aggregated and updated throughout the day. For example, a running total of steps taken during a day. If you wish to push routine data, you should POST a new record for the initial reading and update the same routine record using a PUT for changes throughout the day. Because a single routine record in Validic often represents an aggregate of several records in your system, we suggest that the activity_id you select for routine records reflect the date in some way.
Outside of our standard attributes, Validic is capable of accepting new fields you define as part of your POST. You can add these custom fields as part of the extras field. Consumer organizations can choose to view this data by using an expanded flag in their request for data. They'll be provided with integration notes on any extras you may provide.
Here's an example URL and payload with extras for a Routine object:
POST https://api.validic.com/v1/organizations/{ORGANIZATION_ID}/users/{USER_ID}/fitness.json
-H 'Content-Type': 'application/json'
{
  "fitness": {
    "timestamp": "2015-03-10T07:12:16+00:00",
    "utc_offset": "-05:00",
    "type": "Running",
    "intensity": "medium",
    "start_time": "2015-03-09T02:12:16-05:00",
    "distance": 5149.9,
    "duration": 1959,
    "calories": 350,
    "activity_id": "12345",
    "extras": {
      "stars": 3,
      "stride_length": 5
    }
  },
  "access_token": "VALIDIC_ACCESS_TOKEN"
}
A successful response would look like:
{
  "code": 201,
  "message": "Ok",
  "fitness": {
    "_id": "51552cd8fded0807c400002a",
    "timestamp": "2015-03-10T07:12:16+00:00",
    "utc_offset": "-05:00",
    "type": "Running",
    "intensity": "medium",
    "start_time": "2015-03-09T02:12:16-05:00",
    "distance": 5149.9,
    "duration": 1959,
    "calories": 350,
    "extras": {
      "stars": 3,
      "stride_length" 5
    },
    "source": "sample_app",
    "source_name": "Sample App",
    "last_updated": "2015-03-10T07:12:16+00:00"
  }
}
Many consumer organizations treat data generated using a device differently than data manually entered from a user. To differentiate between the two they rely on the validated flag. Validic Connect Partners who can verify that a record is generated by a device should set the validated to true and include the name of that device as part of an extras field:
POST https://api.validic.com/v1/organizations/{ORGANIZATION_ID}/users/{USER_ID}/fitness.json
-H 'Content-Type': 'application/json'
{
  "fitness": {
    "timestamp": "2015-03-10T07:12:16+00:00",
    "utc_offset": "-05:00",
    "type": "Running",
    "intensity": "medium",
    "start_time": "2015-03-09T02:12:16-05:00",
    "distance": 5149.9,
    "duration": 1959,
    "calories": 350,
    "activity_id": "12345",
    "validated": true,
    "extras": {
      "device": "ACME Pedometer"
    }
  },
  "access_token": "VALIDIC_ACCESS_TOKEN"
}
That response:
{
  "code": 201,
  "message": "Ok",
  "fitness": {
    "_id": "51552cd8fded0807c400002a",
    "timestamp": "2015-03-10T07:12:16+00:00",
    "utc_offset": "-05:00",
    "type": "Running",
    "intensity": "medium",
    "start_time": "2015-03-09T02:12:16-05:00",
    "distance": 5149.9,
    "duration": 1959,
    "calories": 350,
    "validated": true,
    "extras": {
      "device": "ACME Pedometer"
    },
    "source": "sample_app",
    "source_name": "Sample App",
    "last_updated": "2015-03-10T07:12:16+00:00"
  }
}
User Connection Status
It is important to mark users in your system as connected to Validic for as long as they have at least one authorized consumer organization. Your user records should include some kind of connected_to_validic flag that is set to true once the authorization is confirmed with Validic and false once you receive that user’s last disconnect notification. This is evident in the connected_third_parties array present on both sync and disconnect notifications. If a user disconnects from all organizations, you must stop sending data for that user.
Deleting Users
As users get deleted in your system you should delete them in Validic as well. To accomplish this, just pass in the original UID for that user in a DELETE request:
DELETE https://api.validic.com/v1/organizations/{ORGANIZATION_ID}/users.json
-H 'Content-Type': 'application/json'
{
 "uid": "YOUR_USER_ID",
 "access_token": "ORGANIZATION_ACCESS_TOKEN"
}
A best practice for handling historical data (typically covering the last 6 months) is to POST to Validic upon receiving a user’s first Sync Notification.
A Standard Workflow For Posting Historical Data
If a user authorizes access to their data by an additional consumer organization, you do not need to send historical data again. Subsequent authorizations will also receive that user's historic data.
In the case that a user disconnects from all organizations and you stop sending data for a period of time, then the user reconnects you should send historical data that covers the period of time that user was disconnected.
Validic Connect partners should periodically reconcile user data by using the Validic "latest" endpoint to query your users data in Validic. From our Enterprise API documentation:
By default, bulk data calls are ordered by the timestamp of an individual activity. The challenge here is that if an individual was on vacation for a week and syncs a device upon returning, how will you know of data that occurred a week ago but only just made it into the Validic system?
The latest endpoint gives you the latest data recorded and updated in Validic, regardless of when the activity occurred based on the
last_updatedfield. For example, if you pulled and processed Validic data at 4:00 a.m., and then you want to update your system again at 8:00 a.m., you can specify to only receive new and updated data that was added to our system between 4 a.m. and 8 a.m. by appending a timestamp with thestart_dateandend_date.
You can call the latest endpoint with:
GET https://api.validic.com/v1/organizations/{ORGANIZATION_ID}/fitness/latest.json?start_date={TIMESTAMP}&end_date={TIMESTAMP}&access_token={ORGANIZATION_ACCESS_TOKEN}
You should look for discrepancies using each activity’s Validic _id stored from the initial POST request to Validic. You should reconcile any incorrect data with a PUT and reconcile any missing or duplicate data in Validic using a POST or DELETE. A regular reconciliation comparing what is in Validic with what is in your database will ensure consumers and users see the same data from Validic as they do in your application.
Each Standard Object record being sent to Validic Connect has specific requirements. You will need to properly map your data objects to the Validic Standard Objects to be able to push data through Validic Connect. The Core API Documentation provides some additional information you may find helpful when mapping your data to the Validic Standard Objects. Of particular interest might be this explanation of differentiating Fitness and Routine objects.
If you need assistance with mapping your data attributes to Validic’s please email us at partner-support@validic.com. We provide support to help make sure your data is mapped appropriately and we communicate the mapping structure to consumer organizations. If you are having trouble finding a standard endpoint or attribute that makes sense to map to, you can always choose to add custom attributes as “extras” to any of our standard objects.
| Field | Description | Type | Validation |
|---|---|---|---|
| timestamp | Fitness activity timestamp in ISO8601 format | String | Required |
| utc_offset | Timezone for the measurement in "+00:00" format | String | Required |
| type | Type of fitness activity: Walking, Running, Swimming, etc. | String | |
| intensity | Subjective intensity with which an activity was performed. Examples are: low, medium, high. Returned as provided by source | String | |
| start_time | Timestamp of when fitness activity started in ISO8601 format | String | |
| distance | Distance in meters | Double | |
| duration | Duration of fitness activity in seconds | Double | |
| calories | Calories burned during fitness activity | Double | |
| activity_id | Fitness activity record id in your database | String | Must be unique |
| validated | As discussed here, set validated to 'true' if the data is collected by a device, not manual user input | String | |
| device | For validated data, include the device name and/or model here | String |
| Field | Description | Type | Validation |
|---|---|---|---|
| timestamp | See here for info about Routine timestamps | String | Required |
| utc_offset | See here for info about Routine offsets | String | Required |
| steps | Number of steps taken throughout the day | Double | |
| distance | Distance in meters | Double | |
| floors | The number of floors taken throughout the day | Double | |
| elevation | Elevation climbed in meters throughout the day | Double | |
| calories_burned | Calories burned throughout the day | Double | |
| water | Amount of water consumed throughout the day in mL | Double | |
| activity_id | See here for info about Routine activity_ids | String | Must be unique |
| validated | As discussed here, set validated to 'true' if the data is collected by a device, not manual user input | String | |
| device | For validated data, include the device name and/or model here | String |
| Field | Description | Type | Validation |
|---|---|---|---|
| timestamp | Sleep activity timestamp in ISO8601 format | String | Required |
| utc_offset | Timezone for the measurement in "+00:00" format | String | Required |
| awake | Seconds awake during recording | Double | |
| deep | Seconds in deep sleep | Double | |
| light | Seconds in light sleep | Double | |
| rem | Seconds in rapid eye movement | Double | |
| times_woken | Number of times woken during sleep recording | Double | |
| total_sleep | Total number of sleep seconds | Double | |
| activity_id | Sleep record id in your database | String | Must be unique |
| validated | As discussed here, set validated to 'true' if the data is collected by a device, not manual user input | String | |
| device | For validated data, include the device name and/or model here | String |
| Field | Description | Type | Validation |
|---|---|---|---|
| timestamp | Weight activity timestamp in ISO8601 format | String | Required |
| utc_offset | Timezone for the measurement in "+00:00" format | String | Required |
| weight | The value of the measured quantity in kg | Double | |
| height | The value of the measured quantity in cm | Double | |
| free_mass | The value of the measured quantity in kg | Double | |
| fat_percent | The value of the measured quantity | Double | |
| mass_weight | The value of the measured quantity in kg | Double | |
| bmi | The value of the measured quantity | Double | |
| activity_id | Unique identifier of the measurement | String | Must be unique |
| validated | As discussed here, set validated to 'true' if the data is collected by a device, not manual user input | String | |
| device | For validated data, include the device name and/or model here | String |
| Field | Description | Type | Validation |
|---|---|---|---|
| timestamp | Record timestamp in ISO8601 format | String | Required |
| utc_offset | Timezone for the measurement in "+00:00" format | String | Required |
| calories | Calories consumed per food intake | Double | |
| carbohydrates | Grams of carbohydrates consumed | Double | |
| fat | Grams of fat consumed | Double | |
| fiber | Grams of fiber consumed | Double | |
| protein | Grams of protein consumed | Double | |
| sodium | Grams of sodium consumed | Double | |
| water | Grams of water consumed | Double | |
| meal | Meal consumed: Breakfast, Lunch, or Dinner | String | |
| activity_id | Record of meal entry in your database | String | Must be unique |
| validated | As discussed here, set validated to 'true' if the data is collected by a device, not manual user input | String | |
| device | For validated data, include the device name and/or model here | String |
| Field | Description | Type | Validation |
|---|---|---|---|
| timestamp | Record timestamp in ISO8601 format | Double | Required |
| utc_offset | Timezone for the measurement in "+00:00" format | String | Required |
| blood_calcium | The value of the measured quantity in mg/dL | Double | |
| blood_chromium | The value of the measured quantity in µg/L | Double | |
| blood_folic_acid | The value of the measured quantity in ng/mL | Double | |
| blood_magnesium | The value of the measured quantity in mg/dL | Double | |
| blood_potassium | The value of the measured quantity in mEq/L | Double | |
| blood_sodium | The value of the measured quantity in mEq/L | Double | |
| blood_vitamin_b12 | The value of the measured quantity in pg/mL | Double | |
| blood_zinc | The value of the measured quantity in µg/dL | Double | |
| creatine_kinase | The value of the measured quantity in U/L | Double | |
| crp | The value of the measured quantity in mg/L | Double | |
| diastolic | The value of the measured quantity in mmHg | Double | |
| ferritin | The value of the measured quantity in ng/mL | Double | |
| hdl | The value of the measured quantity in mg/dL | Double | |
| hscrp | The value of the measured quantity in mg/L | Double | |
| il6 | The value of the measured quantity in pg/mL | Double | |
| ldl | The value of the measured quantity in mg/dL | Double | |
| resting_heartrate | The value of the measured quantity in bpm | Double | |
| systolic | The value of the measured quantity in mmHg | Double | |
| testosterone | The value of the measured quantity in ng/dL | Double | |
| total_cholesterol | The value of the measured quantity in mg/dL | Double | |
| tsh | The value of the measured quantity in mIU/L | Double | |
| uric_acid | The value of the measured quantity in mg/dL | Double | |
| vitamin_d | The value of the measured quantity in ng/mL | Double | |
| white_cell_count | The value of the measured quantity in cells/µL | Double | |
| spo2 | The value of the measured quantity in % | Double | |
| temperature | The value of the measured temperature in Celsius | Double | |
| activity_id | Unique identifier of the measurement in your system | String | Must be unique |
| validated | As discussed here, set validated to 'true' if the data is collected by a device, not manual user input | String | |
| device | For validated data, include the device name and/or model here | String |
| Field | Description | Type | Validation |
|---|---|---|---|
| timestamp | Record timestamp in ISO8601 format | String | Required |
| utc_offset | Timezone for the measurement in "+00:00" format | String | Required |
| c_peptide | The value of the measured quantity in ng/mL | Double | |
| fasting_plasma_glucose_test | The value of the measured quantity in mg/dL | Double | |
| hba1c | The value of the measured quantity in % | Double | |
| insulin | The value of the measured quantity in U | Double | |
| oral_glucose_tolerance_test | The value of the measured quantity in mg/dL | Double | |
| random_plasma_glucose_test | The value of the measured quantity in mg/dL | Double | |
| triglyceride | The value of the measured quantity in mg/dL | Double | |
| blood_glucose | The value of the measured quantity in mg/dL | Double | |
| relationship_to_meal | Relationship of reading to meal. Should be before, after, random, or fasting. Will default to null if no value provided |
String | |
| activity_id | Diabetes record id in your database | String | Must be unique |
| validated | As discussed here, set validated to 'true' if the data is collected by a device, not manual user input | String | |
| device | For validated data, include the device name and/or model here | String |
Any request with an invalid Organization access token or User authentication token (for mobile applications) will receive a 401 Unauthorized Response.
Example Request:
POST https://api.validic.com/v1/organizations/{ORGANIZATION_ID}/connect/authorization
-H 'Content-Type: application/json'
{
  "uid": "{YOUR_USERS_UID}",
  "signature": "{SIGNATURE}",
  "access_token": "{ORGANIZATION_ACCESS_TOKEN}"
}
| Status Code | Message | Error | Reason | Documentation |
|---|---|---|---|---|
| 200 | OK | Existing user found with same UID. Successfully authorized that user. | http://httpstatus.es/200 | |
| 201 | Authorized | The data was successfully created. The response will contain the created entity. | http://httpstatus.es/201 | |
| 422 | Unprocessable Entity | Signature not provided, invalid, or expired | The signature is missing, incorrect, or has expired. Redirect the user to the marketplace to try authorizing again. | http://httpstatus.es/422 |
| 422 | Unprocessable Entity | UID invalid or not included | The UID is missing or is not a valid UID (e.g. it is an email address) | http://httpstatus.es/422 |
Example Request:
POST https://api.validic.com/v1/organizations/{ORGANIZATION_ID}/authorization/new_user
-H 'Content-Type: application/json'
 {
   "user": {
     "uid": "{YOUR_USER_ID}"
   },
 "pin": "{PINCODE}",
 "access_token": "{ORGANIZATION_ACCESS_TOKEN}"
 }
| Status Code | Message | Error | Reason | Documentation |
|---|---|---|---|---|
| 200 | OK | Existing user found with same UID. Successfully authorized that user. | http://httpstatus.es/200 | |
| 201 | Created | The data was successfully created. The response will contain the created entity. | http://httpstatus.es/201 | |
| 401 | Expired or bad request token | The PIN is missing, incorrect, or has expired. Redirect the user to the marketplace to try authorizing again. | http://httpstatus.es/401 | |
| 422 | Unprocessable Entity | UID invalid or not included | The UID is missing or is not a valid UID (e.g. it is an email address) | http://httpstatus.es/422 |
Example Request:
POST https://api.validic.com/v1/organizations/{ORGANIZATION_ID}/users/{USER_ID}/routine.json
-H 'Content-Type': 'application/json'
{
  "routine": {
    "timestamp": "2013-03-10T00:00:00+00:00",
    "utc_offset": "+00:00",
    "steps": 9355,
    "distance": 7290.33,
    "floors": 23,
    "elevation": 3.4,
    "calories_burned": 2874,
    "activity_id": "12345"
  },
  "access_token": "YOUR_ACCESS_TOKEN"
}
| Status Code | Message | Reason | Documentation |
|---|---|---|---|
| 201 | Created | The data was successfully created. The response will contain the created entity. | http://httpstatus.es/201 |
| 406 | Not Acceptable | Number of records to be created was exceeded. | http://httpstatus.es/406 |
| 422 | Unprocessable Entity | The data was not created because of semantic errors. An error message will be returned in the response explaining the errors. | http://httpstatus.es/422 |
Example Request:
PUT https://api.validic.com/v1/organizations/{ORGANIZATION_ID}/users/{USER_ID}/routine/{VALIDIC_RECORD_ID}.json
-H 'Content-Type': 'application/json'
{
  "routine": {
    "steps": 10355
  },
  "access_token": "YOUR_ACCESS_TOKEN"
}
| Status Code | Message | Reason | Documentation |
|---|---|---|---|
| 200 | OK | The request was received and data was updated. The response will contain the updated entity. | http://httpstatus.es/201 |
| 404 | Not Found | The data to update at the given location was not found. | http://httpstatus.es/404 |
| 406 | Not Acceptable | Number of records to be created was exceeded. | http://httpstatus.es/406 |
| 422 | Unprocessable Entity | The data was not created because of semantic errors. An error message will be returned in the response explaining the errors. | http://httpstatus.es/422 |
Example Request:
DELETE https://api.validic.com/v1/organizations/{ORGANIZATION_ID}/users/{USER_ID}/routine/{VALIDIC_RECORD_ID}.json
-H 'Content-Type': 'application/json'
{
  "access_token": "YOUR_ACCESS_TOKEN"
}
| Status Code | Message | Reason | Documentation |
|---|---|---|---|
| 200 | OK | The request was received and data was deleted. The response will contain the updated entity. | http://httpstatus.es/200 |
| 404 | Not Found | The data to delete at the given location was not found. | http://httpstatus.es/404 |
| 422 | Unprocessable Entity | The data was not deleted because of semantic errors. An error message will be returned in the response explaining the errors. | http://httpstatus.es/422 |
When integrating with Validic, we ask that you continually test your integration, including both the authentication process and the flow of new data. Below we walk through how to test the Authentication and Authorization process as well as the correct flow of data from your system to Validic.
Validic provides a suite of testing tools that makes it easy to ensure your integration is working correctly. To access the tools sign in to your account and navigate to the "developer tools" link in the header.
Before building your integration you should be able to manually test the authentication and authorization process.
GET https://app.validic.com/{TEST_ORGANIZATION_ID}/{TEST_USER_ACCESS_TOKEN}
signature and sync_url passed in the url as parameters. At this point your application should allow the user to login to your system and then, upon successful login, authenticate with Validic using the uid and signature. However, to test manually you should simply be able to send a cURL request to the sync url and supply a dummy uid and the signature (see Authenticating Users Who Want to Share Data above for the specific POST).user credentials, the application, and the redirect_uri.redirect_uri which is a Validic hosted page where you confirm authorization. Once there, click “Authorize” and you should then be returned to the original Validic Marketplace with your application now highlighted as being connected.These steps are also shown through screenshots in the “How it Works” section above. As you build out your application to handle the authentication programmatically, you should continue to walk through this same user experience to ensure everything is working properly.
Once you receive a Sync Notification you can manually test pushing data to Validic.
access_token, organization_id, and the user_id returned in the Sync Notification, you should be able to manually POST a record to Validic. See Submitting User Data above for an example of how to push a single Routine record to Validic.GET https://api.validic.com/v1/organizations/{YOUR_ORGANIZATION_ID}/users/{VALIDIC_USER_ID}/routine.json?access_token={YOUR_ORGANIZATION_ACCESS_TOKEN}
GET https://api.validic.com/v1/organizations/{TEST_ORGANIZATION_ID}/users/{TEST_USER_ID}/routine.json?access_token={TEST_ORGANIZATION_ACCESS_TOKEN}
For a full list of GET requests by object type see the Objects section of our Documentation.
Manually pushing data to Validic and checking to ensure it correctly shows up will make testing your application’s behavior much easier to understand. As you begin to incorporate this functionality into your application, you should be continually testing by recording sample data in your application and check if it shows up on the test user’s activity data.
If you would like to test with additional consumer users rather than repeatedly connected and disconnecting the same consumer user, you must provision them with the test organizational credentials:
POST https://api.validic.com/v1/organizations/{TEST_ORGANIZATION_ID}/users.json
-H 'Content-Type: application/json'
{
  "user": {
    "uid": "{UID}"
  },
  "access_token": "{TEST_ORGANIZATION_ACCESS_TOKEN}"
}